Reset Printer Canon MP 237

-Download Resetter Canon MP237 on the link I have included at the end of this article
-Extract and run reseter MP237 by clicking 2 times File Service tool v3400.exe
-Start doing govern software reseter MP237
Sub Tab Clear Ink Counter to Play
Sub-Tab Ink Absorber Counter to Play
-Click EEPROM then the printer prints a sheet of paper
-Turn the printer off and on again, then you can use the printer again
Download the tools Reset Printer Canon MP 237 here

Resetter Canon MP287 tools
When you got error on your Canon MP287 it will make you confusion and you see error code is E08 and E13 , When the printer is turned on , the printer looks normal. But after ordered to print, it will display an error E08 i'm sure you already know if you come to this page. don't worry i know the solution. the printer need to be rese.
This is the way to reset Canon MP287 bicause of error E08
- Turn off the Canon MP287 error E08 by pressing power. Do not unplug the power cord .
- Press and Hold the STOP / RESET followed by pressing the POWER button . So both buttons depressed position .
- Remove the STOP / RESET but do not release the POWER button .
- In circumstances POWER button still depressed , press the STOP / RESET 6 times.
-Then release both buttons simultaneously .
- Printer will initialize error moments like when the printer is first tested at the time of purchase.
Wait until the LCD panel on the printer error was showing Black ( blank ).
-MP258 printer will be detected as a new device on your computer, although it was already installed the printer driver. -Conditions of blank printer on the LCD indicates that the printer is in Service Mode state and is ready to be reset using software .
- If the power cord is unplugged , then the steps above must be repeated again.
Now you can reset the Canon MP287 with this tools

get from this source hope this step will help you and make your printer can work again.
Continue reading..
This is the way to reset Canon MP287 bicause of error E08
- Turn off the Canon MP287 error E08 by pressing power. Do not unplug the power cord .
- Press and Hold the STOP / RESET followed by pressing the POWER button . So both buttons depressed position .
- Remove the STOP / RESET but do not release the POWER button .
- In circumstances POWER button still depressed , press the STOP / RESET 6 times.
-Then release both buttons simultaneously .
- Printer will initialize error moments like when the printer is first tested at the time of purchase.
Wait until the LCD panel on the printer error was showing Black ( blank ).
-MP258 printer will be detected as a new device on your computer, although it was already installed the printer driver. -Conditions of blank printer on the LCD indicates that the printer is in Service Mode state and is ready to be reset using software .
- If the power cord is unplugged , then the steps above must be repeated again.
Now you can reset the Canon MP287 with this tools
get from this source hope this step will help you and make your printer can work again.
What is a Print Spooler
A print spooler is a type of software that manages printing jobs that an electronic printer produces. Print spoolers are often used in industrial and commercial applications in order to place printing jobs in a specific priority level, depending on the time stamp of each job. They are usually used in situations that involve mass printing or printing by many different users. Print spoolers also alert users when their material has been printed, assign jobs to differentprinters so that multiple materials may be printed simultaneously, automatically select stationary, etc.
How Print Spoolers Work
Print spoolers work by placing printing jobs in a separate area of a hard drive so that they may be processed separately from the application they came from. This removes the burden of processing from the original application and allows it to continue processing other tasks without waiting on the printing job to be completed. For example, if a user prints a document from MS Word, thecomputer’s print spooler automatically separates the printing job from other MS Word tasks and processes it at its own rate. Without a print spooler, the user would not be able to use MS Word or other system resources until the printing job is complete. While this may not interrupt use for an individual user who is only processing one printing job, it can cause entire offices to be temporarily disabled during larger tasks, such as payroll printing.
Applications
Print spoolers are found on personal computers and remove the burden of printing from word processors, photo editors, and other programs. They are also used on commercial computer systems in order to allow all computers in an office to keep processing other tasks while large printing jobs are carried out on a separate hard drive or server. Print spoolers are used in office computers to assign individuals printing jobs to different printers on the same network. This allows the printing job to be completed in much less time and lowers the stress on the resources of each individual computer.
Advantages
Print spoolers allow users to continue what they were doing while a printing job is being processed. Additionally, print spoolers may include features that notify the user about completed tasks or distributing the workload among several devices. Print spoolers are widely available and free versions can usually be found on the Internet or included with printing hardware.
Continue reading..
How Print Spoolers Work
Print spoolers work by placing printing jobs in a separate area of a hard drive so that they may be processed separately from the application they came from. This removes the burden of processing from the original application and allows it to continue processing other tasks without waiting on the printing job to be completed. For example, if a user prints a document from MS Word, thecomputer’s print spooler automatically separates the printing job from other MS Word tasks and processes it at its own rate. Without a print spooler, the user would not be able to use MS Word or other system resources until the printing job is complete. While this may not interrupt use for an individual user who is only processing one printing job, it can cause entire offices to be temporarily disabled during larger tasks, such as payroll printing.
Applications
Print spoolers are found on personal computers and remove the burden of printing from word processors, photo editors, and other programs. They are also used on commercial computer systems in order to allow all computers in an office to keep processing other tasks while large printing jobs are carried out on a separate hard drive or server. Print spoolers are used in office computers to assign individuals printing jobs to different printers on the same network. This allows the printing job to be completed in much less time and lowers the stress on the resources of each individual computer.
Advantages
Print spoolers allow users to continue what they were doing while a printing job is being processed. Additionally, print spoolers may include features that notify the user about completed tasks or distributing the workload among several devices. Print spoolers are widely available and free versions can usually be found on the Internet or included with printing hardware.
Canon mp150 reset codes

E9 The connected digital camera / video camera does not support Camera
Direct Printing
E14 The Ink cartridges whose destination are wrong
E15 Ink cartridge is not installed E16 - Ink remaining is unknown
E16 -E19 Failed to scan head alignment sheet
E22 Carriage error
E23 Paper feed error
E24 Purge unit error
E25 ASF(cam) sensor error
E26 Internal temperature rise error
E27 Waste ink absorber full or platen waste ink absorber full
E28 Ink cartridge temperature rise error -
E29 EEPRsaya error
E33 Paper feed position error
E35 15 USB Host VBUD overcurrent error - USB
E37 17 Abnormal motor driver error
E40 20 Other hardware error
E42 22 Scanner error
How to Resetting the maintenance count LaserJet 9040 9050 Series Printer
1. Turn the printer off.
2. Turn the printer back on and wait for the memory count, when the printer starts counting memory press the checkmark (Select) button.
3. Continue to hold down the checkmark button until all of the control panel LEDs are illuminated, then release the checkmark button.
4. When the checkmark button is released, "Select Language" will appear on the control panel.
5. Use the Up Arrow to scroll to NEW MAINTENANCE KIT .
6. Press the checkmark button.
Continue reading..
2. Turn the printer back on and wait for the memory count, when the printer starts counting memory press the checkmark (Select) button.
3. Continue to hold down the checkmark button until all of the control panel LEDs are illuminated, then release the checkmark button.
4. When the checkmark button is released, "Select Language" will appear on the control panel.
5. Use the Up Arrow to scroll to NEW MAINTENANCE KIT .
6. Press the checkmark button.
Reset Epson T50 and T60 without error 21000068
Get an error 21000068 when resetting your Epson T50 or Epson T60 and not see any solution to prevent the problem. Why not try this tips, but reset this method not recommended for beginner user and you must understand what you are doing. These tips from Jagdish Rathore (India) and I have been granted permission to publish on this blog. He also has been publishing this reset method on his blog on: http://www.epsonservice.blog.com/. If you do not have any knowledge about PCB and electronics, I recommend don’t try this reset methode.
Here the reset method from Jagdish Rathore:
Here the reset method from Jagdish Rathore:
- Turn off printer and open printer.
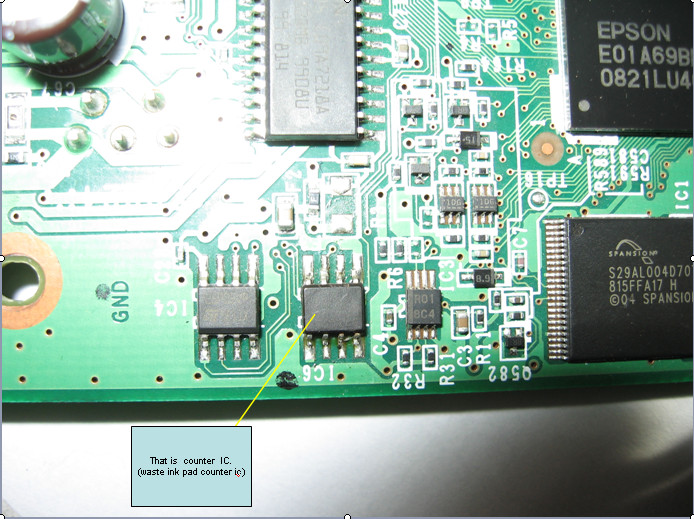
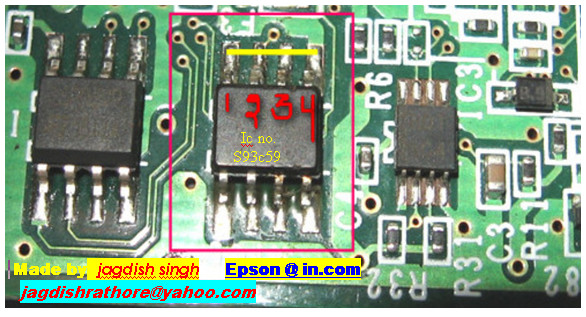
- Open your Epson main PCB board. You can view an 8 pin CMOS IC. That is Epson waste ink counter IC and found on all Epson Printer.
- You can reset your printer without any resetter by following these ways.
- Soldering pin no 1,2,3,4 by wire as show in PICTURE and now turn on printer for ”20 second”
- After 20 second turn off printer and remove soldering wire from pin no. 1,2,3,4 ( back in original condition)
- Now turn on your printer
- And now your printer will be RESET
Resetter Epson stylus T10 T11 T20E TX200 TX400
Suitable for Epson Stylus T10,T11,T20E,TX200,TX400 Inkjet Printer
Original ink cartridges Model
73N Black Ink Cartridge (Standard Ink)
73N Cyan Ink Cartridge (Standard Ink)
73N Magenta Ink Cartridge (Standard Ink)
Specifications:
* Offered with new version Combo chip with Switch and buttons.
* Can used without original Cartridge on with the Switch down
* High quality, low cost, easy maintenance
* 80ml volume of ink for continuous printing without changing cartridges
* Easy setup for long-term usage
* Designed to perform with maximum reliability, efficiency and ease of operation
* Cuts the running costs of printers by 90% because the same ink tanks can be used over and over again
Continue reading..
Original ink cartridges Model
73N Black Ink Cartridge (Standard Ink)
73N Cyan Ink Cartridge (Standard Ink)
73N Magenta Ink Cartridge (Standard Ink)
Specifications:
* Offered with new version Combo chip with Switch and buttons.
* Can used without original Cartridge on with the Switch down
* High quality, low cost, easy maintenance
* 80ml volume of ink for continuous printing without changing cartridges
* Easy setup for long-term usage
* Designed to perform with maximum reliability, efficiency and ease of operation
* Cuts the running costs of printers by 90% because the same ink tanks can be used over and over again
HP Laserjet 4V and 4MV service mode
1. Hold down the [On Line], [Form Feed], and [Enter] keys while powering ON the printer, until all lights are illuminated and the Display Window is blank. (If the Display Window reads 05 SELF TEST at this point, the keys were released too soon. Repeat this step until successful.)
2. Press the [Form Feed] key, then the [Enter] key. The message SERVICE MODE is displayed briefly, then the printer automatically begins a 05 SELF TEST.
After several seconds, both Control Panel Indicators turn OFF. (The printer may display 02 WARMING UP if it has not warmed up completely.) After the printer has warmed up and passed the self test, SERVICE MODE is displayed.
3. Press [Menus] once to display SERVICE MENU.
4. Once it says SERVICE MENU press ITEM to scroll through service mode items.
To exit the Service Mode press the [On Line] key.
Continue reading..
2. Press the [Form Feed] key, then the [Enter] key. The message SERVICE MODE is displayed briefly, then the printer automatically begins a 05 SELF TEST.
After several seconds, both Control Panel Indicators turn OFF. (The printer may display 02 WARMING UP if it has not warmed up completely.) After the printer has warmed up and passed the self test, SERVICE MODE is displayed.
3. Press [Menus] once to display SERVICE MENU.
4. Once it says SERVICE MENU press ITEM to scroll through service mode items.
To exit the Service Mode press the [On Line] key.
How to Reset the protection counter of Epson T13 T1100 TX121 Printer
.png)
FIX PRINTER ERROR "parts inside printer end service life, waste ink pad counter overflow error"
Please follow the steps below to reset the protection counter effectively.
- Double click Adjprog.exe.
- Click “Accept” button.
- Click "Select" button. and choose your printer model then click "OK"
- Click “Particular adjustment mode” button.
- Select on “Waste ink pad counter” and click “OK” button.
- Check on Main pad counter and click on “Initialization” button and the program will reset the protection counter.
- Turn off the printer as a program instructed then turn on again.
- Click “Finish” button. and its done!
Warning: You might end up with ink leaking out of the printer if you dont either replace the waste ink pad or install external waste bin.Download Resetter Epson T13
Download Resetter Epson TX121
Download Resetter Epson T1100
Reset software program for Canon MP198 MP258 MP276 MP496 MP558 MP568 and MP648

Reset software program for Canon MP198, MP258, MP276, MP496, MP558, MP568, and MP648
FIX PRINTER ERROR "parts inside printer end service life, waste ink pad counter overflow error"
Follow the following steps:
All these steps must be done to reset your canon MP198, MP258, MP276, MP496, MP558, MP568, and MP648 printer.
Resetting Ink counter on the Printer.
Step 1:
Run “service_tool 1050.exe”. You can download the service tool software from this link: ServiceTool_1050Step 2:
Confirm detected USB-port numbers on USB port column.
Step 3:
Click “Main button” on Clear ink counter section. Make sure there are papers in the paper feed because the printer
will print after the process is complete.
Step 4:
Click “platen button” on the “Clear ink counter” section. The printer will print again.
Step 5:
Turn off the printer and then turn the printer on. You printer is ready for use.
Printer Reset Program For Samsung Laserjets

Printer Reset Fix Program For-
List support model Samsung ML-1910, V1.01.00.83 Samsung ML-2520, V1.01.00.84 Samsung ML-2580N, V1.01.00.84 Samsung SCX-3200, V3.00.01.08 Samsung SCX-3200, V3.00.01.08 NU
Samsung SCX-3200, V3.00.01.07 Samsung SCX-3200, V3.00.01.07 NU Samsung SCX3200, V3.00.01.09 NU Samsung ML-1860, V1.01.00.18 Samsung ML-1860, V1.01.00.18 NU Samsung ML-1860, V1.01.00.19 NU Samsung ML-1865w, V3.00.01.05 Samsung ML-1865w, V3.00.01.05 NU Samsung ML-1660, V1.01.00.34 Samsung ML-1660, V1.01.00.34 NU
Solution Ink Out error for Epson Printer
At many cases of Epson printer when ink indicator is empty will show message Ink Out error when printing. This problem is usually marked with red led (ink led or resume led) is on (not blinking). There some ways solutions for the case, some among others that is :
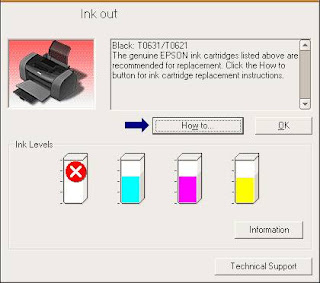

- Using Auto Reset Chips : if using original cartridges replace the original chips of cartridge with autoreset chips.
- Reset Chips of cartridges using chips resetter : some computer and printer shops usually sell chips resetter, otherwise find chips resetter You can use SSC software but at some new Epson printer this software not work (to use the software please read Resetter section on help file)
- Replace the cartridge with new cartridges : this is last solution. Before replace the cartridge ascertain beforehand if problem cause by chips, because I find some cases, ink out error is not caused by chips but cause by print head.
Manual Reseting Procedure for Canon S series I320 1255 iP1000 and iP1500
Manual resetting procedure for Canon Generic S series, Canon i320, i255 , Canon Pixma iP1000 and iP1500
Canon GENERIC "S" SERIES RESET CODE
Waste Ink Counter Reset.
Canon PIXMA iP1000
Waste Ink Counter Reset Manual for Service mode
1. Turn off the printer. And disconnect the printer cable.
2. Press and hold the POWER button, turn on the printer.
3. The indicator (L.E.D.) should be green.
4. Press and release the RESUME button , the indicator (L.E.D.) should be orange.
5. Press and release the RESUME button again, the indicator (L.E.D.) should be green.
6. Release both buttons.
Canon PIXMA iP1500
Waste Ink Counter Reset. Manual for Service mode
1. Turn off the printer. And disconnect the printer cable.
2. Press and hold the POWER button, turn on the printer.
3. The indicator (L.E.D.) should be green.
4. Press and release the RESUME button , the indicator (L.E.D.) should be orange.
5. Press and release the RESUME button again, the indicator (L.E.D.) should be green
6. Release both buttons
Canon i320, i255
Waste Ink Counter Reset.
Methode 1: Manual Temporary
1. Unplug power and USB.
2. Open door and hold power button.
3. Connect power.
4. Close door, then release power button.
Methode 2: Manual Temporary
1. Turn off the printer. And disconnect the printer cable.
2. Press and hold the POWER button, turn on the printer.
3. The indicator (L.E.D.) should be green.
4. Press and release the RESUME button , the indicator (L.E.D.) should be orange.
5. Press and release the RESUME button again, the indicator (L.E.D.) should be green.
6. Release both buttons.
Canon GENERIC "S" SERIES RESET CODE
Waste Ink Counter Reset.
- Turn off the printer.
- Press and hold the RESUME button, then press and hold the POWER button.
- Release the RESUME button, Next press and release the RESUME button two(2) more times in succession. Note: you are still holding the POWER button). The printers carriage will "reset" or move momentarily. If the above was properly performed the printer will enter the "Service Mode".
- Press the RESUME button 4 times, this will select the clear waste ink counter function. The lamp will alternate (change) color with each key press.
- Service/Factory test printout, including ink sensor check.
- EEPRsaya - Info printout.
- EEPRsaya - Initialization.
- Reset the Waste ink counter.
- Printer model setting. (More selections beyond this point - However it is best leave them unaltered - You have been warned!)
Canon PIXMA iP1000
Waste Ink Counter Reset Manual for Service mode
1. Turn off the printer. And disconnect the printer cable.
2. Press and hold the POWER button, turn on the printer.
3. The indicator (L.E.D.) should be green.
4. Press and release the RESUME button , the indicator (L.E.D.) should be orange.
5. Press and release the RESUME button again, the indicator (L.E.D.) should be green.
6. Release both buttons.
Canon PIXMA iP1500
Waste Ink Counter Reset. Manual for Service mode
1. Turn off the printer. And disconnect the printer cable.
2. Press and hold the POWER button, turn on the printer.
3. The indicator (L.E.D.) should be green.
4. Press and release the RESUME button , the indicator (L.E.D.) should be orange.
5. Press and release the RESUME button again, the indicator (L.E.D.) should be green
6. Release both buttons
Canon i320, i255
Waste Ink Counter Reset.
Methode 1: Manual Temporary
1. Unplug power and USB.
2. Open door and hold power button.
3. Connect power.
4. Close door, then release power button.
Methode 2: Manual Temporary
1. Turn off the printer. And disconnect the printer cable.
2. Press and hold the POWER button, turn on the printer.
3. The indicator (L.E.D.) should be green.
4. Press and release the RESUME button , the indicator (L.E.D.) should be orange.
5. Press and release the RESUME button again, the indicator (L.E.D.) should be green.
6. Release both buttons.
How to reset Epson R390 waste ink pad counter

1. Turn on the printer
2. Set the pc date setting to 1 January 2007
3. Adjprog.exe run from the extract of a folder (or locate the file or application. Exe and run it)
4. Click accept
5. Click on the particular mode adjustment
6. Go to interview Then select waste ink pad counter then click ok
7. Click "button box" until it is done then click "initialization" button and then click "finish button"
8. Turn off the printer for 5secs then turn again
9. Set the date today. download Here
How to reset the counter protection of Canon Pixma IP2770

FIX PRINTER ERROR "parts inside printer end service life, waste ink pad counter overflow error"
Canon PIXMA iP2770 are classified into photo printers. This printer is very suitable for use at home. Results in getting the equivalent of lab quality photos. The speed of this printer quickly spelled out that is about 7 ipm for mono and the 4.8 ipm for color and for 4R-sized photo takes 55 seconds. Resolution of Canon PIXMA iP2770 printer at 4800 x 1200dpi (max). Still uses USB 2.0 connectivity and the type cartridge using PG-810, CL-811 (PG-810XL, CL811XL Optional). For this printer weight of 3.4 kg with dimensions of 445 X 250 X 130mm.
Canon PIXMA iP2770 are classified into photo printers. This printer is very suitable for use at home. Results in getting the equivalent of lab quality photos. The speed of this printer quickly spelled out that is about 7 ipm for mono and the 4.8 ipm for color and for 4R-sized photo takes 55 seconds. Resolution of Canon PIXMA iP2770 printer at 4800 x 1200dpi (max). Still uses USB 2.0 connectivity and the type cartridge using PG-810, CL-811 (PG-810XL, CL811XL Optional). For this printer weight of 3.4 kg with dimensions of 445 X 250 X 130mm.
If a lights blink on the POWER and RESUME button alternately and it will show an error 5B00. It means that your ink absorber inside the printer is almost full. In order to solve this you need to clear or reset the counter protection of your printer. To do this, follow this steps.
First make sure that the power cable and usb cable are connected, before you perform the reset procedure. And download the resetter at the bottom of this post.
FIRST STEPS: Entering Service Mode
You have to enter in service mode in order to used the resetter. To do that follow this procedure,
1. Turn off the printer without pulling the power cords.
2. Hold down Resume button and press Power button.
3. Keep holding down Power button and let Resume button go.
4. Then Press Resume button 5 times then let BOTH buttons go.
5. You will notice that the Alternate Blinking error is gone, this means that the printer is in Service Mode state.
SECOND STEPS: Using the Resetter
1. After you download the resetter, extract it and double click "servicetool.exe"
2. Press the "Main" Button, Then press "EEPRsaya Clear" button if a pop-up appear just click OK
5. Then power off the printer(sometimes you have to press twice the power button to turn off) and turn on again. and its done!
Warning: Getting rid of the error message won’t change that you might end up with ink leaking out of the printer if you don’t either replace or clean the ink wastepad.
This is a new Service Tool
Know How to Reset Samsung ML 2240 laserjet printer

"How to reset samsung ml-2240 toner chip, samsung ml-2240 error light, samsung ml-2240 red light,error samsung ml-2240"
Printer Samsung ML-2240 is an very good laser printer in very less cost. But the problem is that, when we refill the cartridge with toner it doesnt print
giving red flashing led and will ask for changing the toner cartridge(New Toner Cartridge Is Costlier So, you can save money by simple resetting your
printer)
How to Reset Samsung ML-2240 laserjet printer? Do the steps below..
1. Open the back cover of the printer by unscrew 2 nuts.

2. There are 2 PCBs inside, which one is the Power supply circuit board and other is main printer board i.e., green color.
3. Find a small eprom 93C66 IC (8 pin) in Green Printer Board.

4. Connect PIN 1 and 4 of the IC 93C66 with a small cable and solder it.

5. Then make sure all the cables are plugged back, and turn on the printer Samsung ML-2240.
6. Wait a few moments until the Samsung ML-2240 Printer calibration is complete and the lights flash green.
7. After a light green flame, turn off the printer.
8. Disconnect the small cable that connects pin 1 and 4 IC 93C66.
9. Close the printer Samsung ML-2240, do not forget to attach the screw.
10. Samsung ML-2240 printer is ready for use again.
Driver Download for Epson Expression Home XP 202 Driver
Continue reading..

E Books How to Refill Toner Cartridge and Inkjet Cartridge
If the cartridge (for inkjet printer) or toner (for toner printer) in the printer empty or almost empty usually everyone also ask “How to refill my printer cartridge?”. On this e-books you can find out the answer for the question. Maybe this ebbok the only ebbok that privide complete tutorial how to refill almost all toner cartridge or inkjet cartridges
Several printer types that mentioned in this ebook tutorial that is Brother, Canon, Compaq, Dell, Digital, Epson, Hewlett Packard (HP), Lexmark, Okidata, Pitney Bowes, Sharp, Xerox cartridges. If you having priner service station or you are home user you must download this useful ebook because in this contain complete tutorial to refill printer cartridges.
All tutorial on this e-book has completed with the picture so it will make the user can follow the tutorial “how to refill printer cartridges” in this e-book. The e-book tutorial is produced by www.uni-kit.com, If you want to download the e-book you can download from following link (I hope this ebook will helpful and useful for you):
Download ebook Tutorial how to refill inkjet cartridges (for inkjet printer types)
Download ebook Tutorial how to refill toner cartridges (for laser printer types)
Several printer types that mentioned in this ebook tutorial that is Brother, Canon, Compaq, Dell, Digital, Epson, Hewlett Packard (HP), Lexmark, Okidata, Pitney Bowes, Sharp, Xerox cartridges. If you having priner service station or you are home user you must download this useful ebook because in this contain complete tutorial to refill printer cartridges.
All tutorial on this e-book has completed with the picture so it will make the user can follow the tutorial “how to refill printer cartridges” in this e-book. The e-book tutorial is produced by www.uni-kit.com, If you want to download the e-book you can download from following link (I hope this ebook will helpful and useful for you):
Download ebook Tutorial how to refill inkjet cartridges (for inkjet printer types)
Download ebook Tutorial how to refill toner cartridges (for laser printer types)
How to Reset Epson Stylus Color Printers
There are 2 ways to reset epson printers counter, that is, youy can use software resetter (SSC or Adj Program) or reset manual. If Reset use software, you can follow the scent usage of software, if reset manual, using combination button in the printers.
Following some ways to reset manual Epson Printers :
1. EPSON Stylus Color
3. EPSON Stylus Color 400, 600
4. EPSON Stylus Color 440, 640, 740, 460, 660, 670, 760, 860, 880, 1160
5. EPSON Stylus Color 680
6. EPSON Stylus Photo 785, 895
7. EPSON Stylus Photo 890, 1280, 1290
8. EPSON Stylus Color 800, 850
9. EPSON Stylus Color 900, 980
10. EPSON Stylus Color 3000
Following some ways to reset manual Epson Printers :
1. EPSON Stylus Color
- Pressing and holding ALT+FONT+LOAD+PAUSE buttons combination
- Press POWER button
- Release all buttons
3. EPSON Stylus Color 400, 600
- Pressing and holding LOAD/EJECT and CLEANING buttons
- Press POWER button and hold it until you will see blinking INK OUT and PAPER OUT leds
- Release all buttons
- In 2-3 seconds time press LOAD/EJECT and CLEANING buttons again.
4. EPSON Stylus Color 440, 640, 740, 460, 660, 670, 760, 860, 880, 1160
- Pressing and holding LOAD/EJECT and CLEANING buttons
- Press POWER button and hold it until You will see blinking INK OUT and PAPER OUT leds.
- Release all buttons.
- In 2-3 seconds time press and hold CLEANING button, until all leds will blink.
5. EPSON Stylus Color 680
- Pressing and holding LOAD/EJECT and CLEANING buttons,
- Press POWER button and hold it until You will see blinking INK OUT and PAPER OUT leds.
- Release all buttons.
- In 2-3 seconds time press and hold LOAD/EJECT button, until all leds will blink.
6. EPSON Stylus Photo 785, 895
- Pressing and holding Maintenance and Roll Paper buttons
- Press POWER button, You will see blinking Error led.
- Release all buttons.
- In 2-3 seconds time until led is blinking press and hold for 10-12 seconds Roll Paper button, until all leds will blink.
7. EPSON Stylus Photo 890, 1280, 1290
- Pressing and holding Maintenance and Roll Paper buttons, press POWER button, You will see blinking Power led
- Release all buttons
- In 2-3 seconds time until led is blinking press and hold for 10-12 seconds Roll Paper button, until all leds will blink
- In 2-3 seconds time press LOAD/EJECT and CLEANING buttons again.
8. EPSON Stylus Color 800, 850
- Pressing and holding LOAD, CLEANING Color and CLEANING Black buttons
- Press POWER button and hold it until You will see blinking INK OUT and PAPER OUT leds.
- Release all buttons.
- In 2-3 seconds time press and release CLEANING Color button, You will see leds blinking.
9. EPSON Stylus Color 900, 980
- Pressing and holding LOAD/EJECT and CLEANING buttons
- Press POWER button, You will see blinking INK OUT led
- Release all buttons
- In 2-3 seconds time press and hold CLEANING button for 10-12 seconds.
10. EPSON Stylus Color 3000
- Pressing and holding PAUSE, LF/FF and DOWN ARROW buttons
- Turn on printer.
- Release all buttons.
HP Laserjet 5000 series service mode
1. Hold down [Select] and [Cancel Job] while turning on the printer.
(If the control panel reads INITIALIZING, the keys were released too soon.)
2. Press the right side of the [Menu] key, then press [Select]. The message SERVICE MODE is displayed.
3. Press [Menus] once to display SERVICE MENU.
4. Once it says SERVICE MENU press ITEM to scroll through service mode items.
To exit the Service Mode press [Go].
Continue reading..
(If the control panel reads INITIALIZING, the keys were released too soon.)
2. Press the right side of the [Menu] key, then press [Select]. The message SERVICE MODE is displayed.
3. Press [Menus] once to display SERVICE MENU.
4. Once it says SERVICE MENU press ITEM to scroll through service mode items.
To exit the Service Mode press [Go].
Subscribe to:
Posts (Atom)