Showing posts with label reset. Show all posts
Showing posts with label reset. Show all posts
Canon mp150 reset codes
MP150/MP160 ERROR CODE
E9 The connected digital camera / video camera does not support Camera
Direct Printing
E14 The Ink cartridges whose destination are wrong
E15 Ink cartridge is not installed E16 - Ink remaining is unknown
E16 -E19 Failed to scan head alignment sheet
E22 Carriage error
E23 Paper feed error
E24 Purge unit error
E25 ASF(cam) sensor error
E26 Internal temperature rise error
E27 Waste ink absorber full or platen waste ink absorber full
E28 Ink cartridge temperature rise error -
E29 EEPRsaya error
E33 Paper feed position error
E35 15 USB Host VBUD overcurrent error - USB
E37 17 Abnormal motor driver error
E40 20 Other hardware error
E42 22 Scanner error
Continue reading..
E9 The connected digital camera / video camera does not support Camera
Direct Printing
E14 The Ink cartridges whose destination are wrong
E15 Ink cartridge is not installed E16 - Ink remaining is unknown
E16 -E19 Failed to scan head alignment sheet
E22 Carriage error
E23 Paper feed error
E24 Purge unit error
E25 ASF(cam) sensor error
E26 Internal temperature rise error
E27 Waste ink absorber full or platen waste ink absorber full
E28 Ink cartridge temperature rise error -
E29 EEPRsaya error
E33 Paper feed position error
E35 15 USB Host VBUD overcurrent error - USB
E37 17 Abnormal motor driver error
E40 20 Other hardware error
E42 22 Scanner error
Reset Epson T50 and T60 without error 21000068
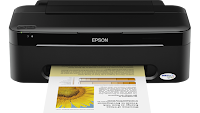
Get an error 21000068 when resetting your Epson T50 or Epson T60 and not see any solution to prevent the problem. Why not try this tips, but reset this method not recommended for beginner user and you must understand what you are doing. These tips from Jagdish Rathore (India) and I have been granted permission to publish on this blog. He also has been publishing this reset method on his blog on: http://www.epsonservice.blog.com/. If you do not have any knowledge about PCB and electronics, I recommend don’t try this reset methode.
Here the reset method from Jagdish Rathore:
Here the reset method from Jagdish Rathore:
- Turn off printer and open printer.
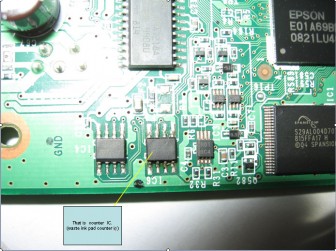
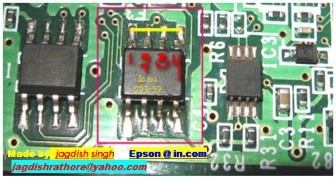
- Open your Epson main PCB board. You can view an 8 pin CMOS IC. That is Epson waste ink counter IC and found on all Epson Printer.

- You can reset your printer without any resetter by following these ways.
- Soldering pin no 1,2,3,4 by wire as show in PICTURE and now turn on printer for ”20 second”

- After 20 second turn off printer and remove soldering wire from pin no. 1,2,3,4 ( back in original condition)
- Now turn on your printer
- And now your printer will be RESET
How to Reset the protection counter of Epson T13 T1100 TX121 Printer
.png)
FIX PRINTER ERROR "parts inside printer end service life, waste ink pad counter overflow error"
Please follow the steps below to reset the protection counter effectively.
- Double click Adjprog.exe.
- Click “Accept” button.
- Click "Select" button. and choose your printer model then click "OK"
- Click “Particular adjustment mode” button.
- Select on “Waste ink pad counter” and click “OK” button.
- Check on Main pad counter and click on “Initialization” button and the program will reset the protection counter.
- Turn off the printer as a program instructed then turn on again.
- Click “Finish” button. and its done!
Warning: You might end up with ink leaking out of the printer if you dont either replace the waste ink pad or install external waste bin.Download Resetter Epson T13
Download Resetter Epson TX121
Download Resetter Epson T1100
Reset software program for Canon MP198 MP258 MP276 MP496 MP558 MP568 and MP648
Reset software program for Canon MP198, MP258, MP276, MP496, MP558, MP568, and MP648
FIX PRINTER ERROR "parts inside printer end service life, waste ink pad counter overflow error"
Follow the following steps:
All these steps must be done to reset your canon MP198, MP258, MP276, MP496, MP558, MP568, and MP648 printer.
Resetting Ink counter on the Printer.
Step 1:
Run “service_tool 1050.exe”. You can download the service tool software from this link: ServiceTool_1050Step 2:
Confirm detected USB-port numbers on USB port column.
Step 3:
Click “Main button” on Clear ink counter section. Make sure there are papers in the paper feed because the printer
will print after the process is complete.
Step 4:
Click “platen button” on the “Clear ink counter” section. The printer will print again.
Step 5:
Turn off the printer and then turn the printer on. You printer is ready for use.
Printer Reset Program For Samsung Laserjets
Printer Reset Fix Program For-
List support model Samsung ML-1910, V1.01.00.83 Samsung ML-2520, V1.01.00.84 Samsung ML-2580N, V1.01.00.84 Samsung SCX-3200, V3.00.01.08 Samsung SCX-3200, V3.00.01.08 NU
Samsung SCX-3200, V3.00.01.07 Samsung SCX-3200, V3.00.01.07 NU Samsung SCX3200, V3.00.01.09 NU Samsung ML-1860, V1.01.00.18 Samsung ML-1860, V1.01.00.18 NU Samsung ML-1860, V1.01.00.19 NU Samsung ML-1865w, V3.00.01.05 Samsung ML-1865w, V3.00.01.05 NU Samsung ML-1660, V1.01.00.34 Samsung ML-1660, V1.01.00.34 NUHow to reset Epson R390 waste ink pad counter

1. Turn on the printer
2. Set the pc date setting to 1 January 2007
3. Adjprog.exe run from the extract of a folder (or locate the file or application. Exe and run it)
4. Click accept
5. Click on the particular mode adjustment
6. Go to interview Then select waste ink pad counter then click ok
7. Click "button box" until it is done then click "initialization" button and then click "finish button"
8. Turn off the printer for 5secs then turn again
9. Set the date today. download Here
How to reset the counter protection of Canon Pixma IP2770
FIX PRINTER ERROR "parts inside printer end service life, waste ink pad counter overflow error"
Canon PIXMA iP2770 are classified into photo printers. This printer is very suitable for use at home. Results in getting the equivalent of lab quality photos. The speed of this printer quickly spelled out that is about 7 ipm for mono and the 4.8 ipm for color and for 4R-sized photo takes 55 seconds. Resolution of Canon PIXMA iP2770 printer at 4800 x 1200dpi (max). Still uses USB 2.0 connectivity and the type cartridge using PG-810, CL-811 (PG-810XL, CL811XL Optional). For this printer weight of 3.4 kg with dimensions of 445 X 250 X 130mm.
Canon PIXMA iP2770 are classified into photo printers. This printer is very suitable for use at home. Results in getting the equivalent of lab quality photos. The speed of this printer quickly spelled out that is about 7 ipm for mono and the 4.8 ipm for color and for 4R-sized photo takes 55 seconds. Resolution of Canon PIXMA iP2770 printer at 4800 x 1200dpi (max). Still uses USB 2.0 connectivity and the type cartridge using PG-810, CL-811 (PG-810XL, CL811XL Optional). For this printer weight of 3.4 kg with dimensions of 445 X 250 X 130mm.
If a lights blink on the POWER and RESUME button alternately and it will show an error 5B00. It means that your ink absorber inside the printer is almost full. In order to solve this you need to clear or reset the counter protection of your printer. To do this, follow this steps.
First make sure that the power cable and usb cable are connected, before you perform the reset procedure. And download the resetter at the bottom of this post.
FIRST STEPS: Entering Service Mode
You have to enter in service mode in order to used the resetter. To do that follow this procedure,
1. Turn off the printer without pulling the power cords.
2. Hold down Resume button and press Power button.
3. Keep holding down Power button and let Resume button go.
4. Then Press Resume button 5 times then let BOTH buttons go.
5. You will notice that the Alternate Blinking error is gone, this means that the printer is in Service Mode state.
SECOND STEPS: Using the Resetter
1. After you download the resetter, extract it and double click "servicetool.exe"
2. Press the "Main" Button, Then press "EEPRsaya Clear" button if a pop-up appear just click OK
5. Then power off the printer(sometimes you have to press twice the power button to turn off) and turn on again. and its done!
Warning: Getting rid of the error message won’t change that you might end up with ink leaking out of the printer if you don’t either replace or clean the ink wastepad.
This is a new Service Tool
Know How to Reset Samsung ML 2240 laserjet printer
Know How to Reset Samsung ML-2240 laserjet printer
"How to reset samsung ml-2240 toner chip, samsung ml-2240 error light, samsung ml-2240 red light,error samsung ml-2240"
Printer Samsung ML-2240 is an very good laser printer in very less cost. But the problem is that, when we refill the cartridge with toner it doesnt print
giving red flashing led and will ask for changing the toner cartridge(New Toner Cartridge Is Costlier So, you can save money by simple resetting your
printer)
How to Reset Samsung ML-2240 laserjet printer? Do the steps below..
1. Open the back cover of the printer by unscrew 2 nuts.
2. There are 2 PCBs inside, which one is the Power supply circuit board and other is main printer board i.e., green color.
3. Find a small eprom 93C66 IC (8 pin) in Green Printer Board.
4. Connect PIN 1 and 4 of the IC 93C66 with a small cable and solder it.
5. Then make sure all the cables are plugged back, and turn on the printer Samsung ML-2240.
6. Wait a few moments until the Samsung ML-2240 Printer calibration is complete and the lights flash green.
7. After a light green flame, turn off the printer.
8. Disconnect the small cable that connects pin 1 and 4 IC 93C66.
9. Close the printer Samsung ML-2240, do not forget to attach the screw.
10. Samsung ML-2240 printer is ready for use again.
How to Reset Epson Stylus Color Printers
There are 2 ways to reset epson printers counter, that is, youy can use software resetter (SSC or Adj Program) or reset manual. If Reset use software, you can follow the scent usage of software, if reset manual, using combination button in the printers.
Following some ways to reset manual Epson Printers :
1. EPSON Stylus Color
3. EPSON Stylus Color 400, 600
4. EPSON Stylus Color 440, 640, 740, 460, 660, 670, 760, 860, 880, 1160
5. EPSON Stylus Color 680
6. EPSON Stylus Photo 785, 895
7. EPSON Stylus Photo 890, 1280, 1290
8. EPSON Stylus Color 800, 850
9. EPSON Stylus Color 900, 980
10. EPSON Stylus Color 3000
Following some ways to reset manual Epson Printers :
1. EPSON Stylus Color
- Pressing and holding ALT+FONT+LOAD+PAUSE buttons combination
- Press POWER button
- Release all buttons
3. EPSON Stylus Color 400, 600
- Pressing and holding LOAD/EJECT and CLEANING buttons
- Press POWER button and hold it until you will see blinking INK OUT and PAPER OUT leds
- Release all buttons
- In 2-3 seconds time press LOAD/EJECT and CLEANING buttons again.
4. EPSON Stylus Color 440, 640, 740, 460, 660, 670, 760, 860, 880, 1160
- Pressing and holding LOAD/EJECT and CLEANING buttons
- Press POWER button and hold it until You will see blinking INK OUT and PAPER OUT leds.
- Release all buttons.
- In 2-3 seconds time press and hold CLEANING button, until all leds will blink.
5. EPSON Stylus Color 680
- Pressing and holding LOAD/EJECT and CLEANING buttons,
- Press POWER button and hold it until You will see blinking INK OUT and PAPER OUT leds.
- Release all buttons.
- In 2-3 seconds time press and hold LOAD/EJECT button, until all leds will blink.
6. EPSON Stylus Photo 785, 895
- Pressing and holding Maintenance and Roll Paper buttons
- Press POWER button, You will see blinking Error led.
- Release all buttons.
- In 2-3 seconds time until led is blinking press and hold for 10-12 seconds Roll Paper button, until all leds will blink.
7. EPSON Stylus Photo 890, 1280, 1290
- Pressing and holding Maintenance and Roll Paper buttons, press POWER button, You will see blinking Power led
- Release all buttons
- In 2-3 seconds time until led is blinking press and hold for 10-12 seconds Roll Paper button, until all leds will blink
- In 2-3 seconds time press LOAD/EJECT and CLEANING buttons again.
8. EPSON Stylus Color 800, 850
- Pressing and holding LOAD, CLEANING Color and CLEANING Black buttons
- Press POWER button and hold it until You will see blinking INK OUT and PAPER OUT leds.
- Release all buttons.
- In 2-3 seconds time press and release CLEANING Color button, You will see leds blinking.
9. EPSON Stylus Color 900, 980
- Pressing and holding LOAD/EJECT and CLEANING buttons
- Press POWER button, You will see blinking INK OUT led
- Release all buttons
- In 2-3 seconds time press and hold CLEANING button for 10-12 seconds.
10. EPSON Stylus Color 3000
- Pressing and holding PAUSE, LF/FF and DOWN ARROW buttons
- Turn on printer.
- Release all buttons.
Wic Reset v 3 01 0001 Tool For EPSON PRINTERS
Wic Reset v.3.01.0001 Tool For EPSON PRINTERS.
FIX PRINTER ERROR "parts inside printer end service life, waste ink pad counter overflow error"
SOLVED ERROR FOR - PARTS INSIDE YOUR PRINTER ARE AT THE END OF THEIR LIFE.
SOLVED ERROR FOR - INK PADS NEED CHANGING.
SOLVED ERROR FOR - E-letter IN THE DISPLAY AND FLASHING LIGHTS.
SOLVED ERROR FOR - YOU ARE BEING TOLD TO TAKE YOUR PRINTER TO AN EPSON SERVICE CENTER.
Wic Reset TOOL Compatible WITH FOLLOWING PRINTER MODELS
Artisan: Artisan 50, Artisan 700, Artisan 710, Artisan 800, Artisan810
B: B300
BX: BX300F, BX310, BX600, BX610, B1100
C: C58, C59, C63, C64, C65, C67, C68, C76, C77, C78, C79, C82, C83, C84, C85
C86, C87, C88, C90, C91, C92, C93, C94, C95, C97, C98, C99, C110, C120
CX: CX2800, CX2900, CX3100, CX3200, CX3300, CX3400, CX3500, CX3600, CX3650,
CX3900, CX4100, CX4500, CX4600, CX4700, CX4900, CX5700F, CX5900, CX6300, CX6400,
CX6500, CX6600, CX7300, CX8300, CX8400, CX9300F, CX9400Fax, CX9500F
D: D68, D78, D88, D92, D120
DX: DX4200, DX4800, DX5000, DX7400, DX8400, DX9400F
ME: ME30, ME32, ME70, ME300, ME320, ME360
NX: NX200, NX300, NX305, NX400, NX410, NX415, NX420W, NX510
P: P50, P60
PX: PX610, PX650, PX659, PX660, PX700W, PX710W, PX720WD, PX800FW, PX810FW
Photo: Photo 820, 830, 950, 1390, 1400, 1410
PictureMate: PM100, PM210, PM215, PM225 PM235, PM240, PM250, PM260, PM270, PM280,
PM290, PM310, PM-G4500
R: R200, R210, R220, R230, R240, R245, R250, R260, R265, R270, R280, R285,
R290, R295, R300, R310, R320, R330, R340, R350, R360, R380, R390, R800,
R1800, R1900, R2400, R2880
RX: RX420, RX425, RX430, RX500, RX510, RX520, RX530, RX560, RX565, RX580, RX585, RX590, RX595,
RX600, RX610, RX615, RX620, RX630, RX640, RX650, RX680, RX685, RX690, RX700
S: S20, S21, S22
SX: SX100, SX105, SX110, SX115, SX117, SX125, SX200, SX205, SX210, SX400,
SX405, SX410, SX415, SX420W, SX425W, SX510, SX515, SX600, SX610
T: T10, T11, T13, T20, T21, T23, T24, T26, T27, T30, T33, T40W, T50, T59,
T60, T1100, T1110
TX: TX100, TX101, TX102, TX103, TX105, TX106, TX109, TX110, TX111, TX115, TX117, TX119, TX121
TX200, TX209, TX210, TX219, TX220, TX300F
TX400, TX405, TX408, TX409, TX410, TX419, TX420W
TX510FN, TX515FN, TX550W, TX600FW, TX650, TX659
TX700W, TX710W, TX720WD, TX800FW, TX810FW, TX820FWD
WorkForce: WorkForce 30, 40, 310, 315, 600, 610, 1100 download here


